Pan Seared Garlic Butter Scallops
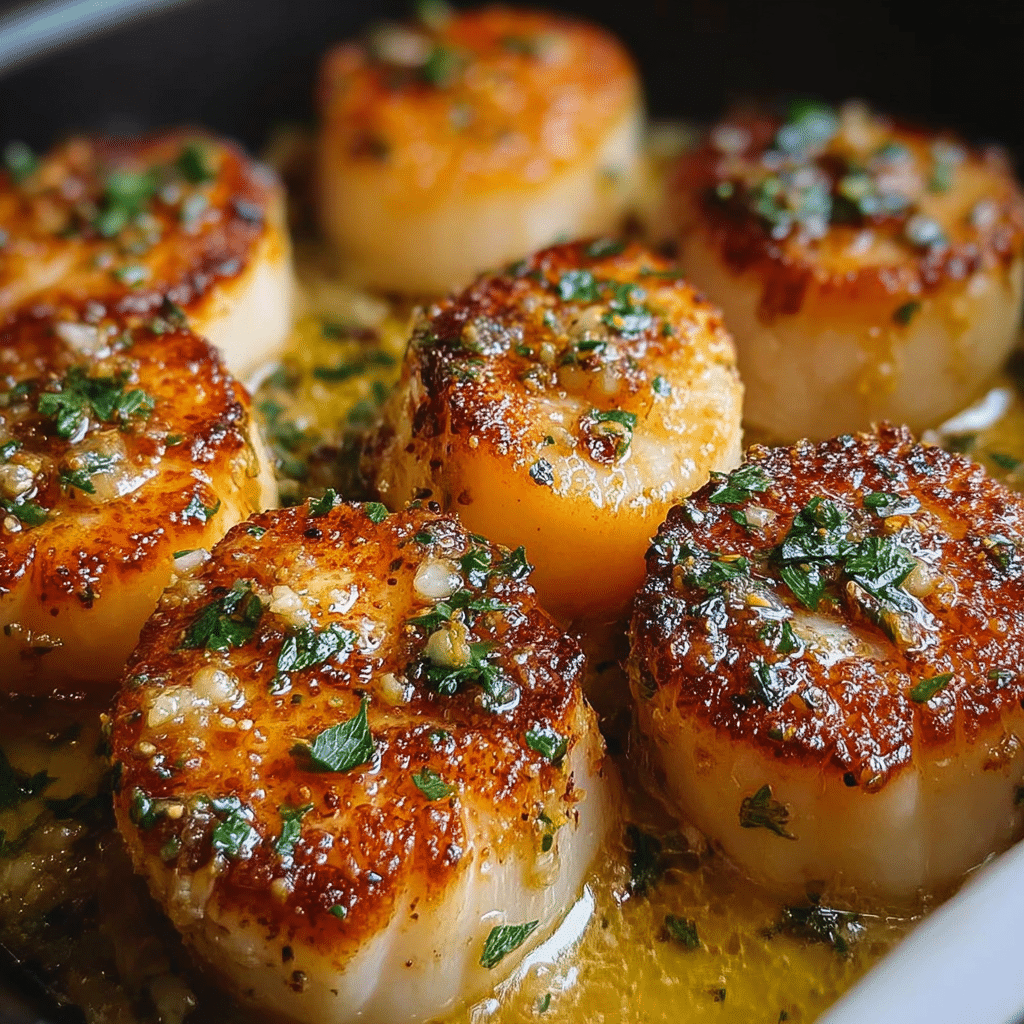
Discover juicy, flavorful Pan Seared Garlic Butter Scallops with a crispy golden crust in this easy, restaurant-quality recipe. This dish perfectly combines delicate scallops with rich garlic butter, creating a mouthwatering experience that’s both simple to make and impressive to serve. Whether you’re cooking for a special occasion or a quick weeknight dinner, these pan seared scallops deliver on taste and texture every time.
Why You’ll Love This Recipe
- Quick and Easy: Ready in under 20 minutes, it’s perfect for busy weeknights or last-minute meals.
- Restaurant-Quality Results: Achieve a golden, crispy crust and tender interior just like your favorite seafood spot.
- Rich, Flavorful Sauce: The garlic butter elevates the natural sweetness of scallops without overpowering.
- Versatile Serving Options: Comes together beautifully with pasta, rice, or fresh greens.
- Impresses Every Time: A simple yet elegant dish that feels gourmet but is beginner-friendly.
Ingredients You’ll Need
The magic behind great Pan Seared Garlic Butter Scallops lies in straightforward, fresh ingredients. Each one plays a crucial role in delivering the perfect blend of flavors and textures—from the juicy scallops to the fragrant garlic and herbs that brighten the dish.
- Fresh Sea Scallops: Look for dry-packed scallops without preservative gels for the best sear and texture.
- Unsalted Butter: Provides richness and a silky base for the garlic sauce without adding excess salt.
- Garlic Cloves: Fresh minced garlic infuses the butter with bold, aromatic flavor.
- Olive Oil: Adds a high smoke point and subtle fruitiness, preventing scallops from sticking.
- Fresh Parsley: Chopped parsley brings a fresh, bright finish and lovely color contrast.
- Lemon Juice: A squeeze of fresh lemon juice balances the richness and adds a zesty touch.
- Salt and Pepper: Essential for seasoning and highlighting the scallops’ natural sweetness.
Variations for Pan Seared Garlic Butter Scallops
One of the best things about this recipe is how easy it is to tailor it to your tastes or dietary needs. Try these variations to switch things up or make the dish your own.
- Spicy Kick: Add crushed red pepper flakes to the garlic butter for a subtle heat boost.
- Herb Infusion: Substitute parsley with fresh thyme or basil for a different herbal note.
- Gluten-Free Option: Simply ensure all ingredients, especially butter and seasonings, are gluten-free to keep it safe.
- Creamy Twist: Stir in a splash of heavy cream to the butter sauce for an indulgent finish.
- Asian-Inspired: Add a splash of soy sauce and grated ginger for an umami-packed flavor.

How to Make Pan Seared Garlic Butter Scallops
Step 1: Prepare the Scallops
Pat your fresh scallops dry with paper towels—this is crucial for achieving that golden crust. Remove the small side muscle if still attached, and season both sides lightly with salt and pepper.
Step 2: Heat Your Pan
Heat a large skillet over medium-high heat and add olive oil. Allow the oil to shimmer hot but not smoking before adding the scallops to ensure an even sear.
Step 3: Sear the Scallops
Place scallops gently into the hot pan, leaving space between each one. Cook without moving them for about 2 minutes on the first side until a deep golden crust forms. Flip and cook another 1-2 minutes until just opaque inside.
Step 4: Add Garlic Butter
Reduce the heat to medium-low and add the butter and minced garlic to the pan. Spoon the garlic butter over the scallops repeatedly for about a minute, allowing the scallops to soak up the rich flavors.
Step 5: Finish with Herbs and Lemon
Sprinkle chopped parsley and squeeze fresh lemon juice over the scallops just before removing them from the heat. This brightens the dish and adds a fresh herbal aroma.
Pro Tips for Making Pan Seared Garlic Butter Scallops
- Dry Scallops Are Key: Wet scallops steam instead of sear, so always pat them completely dry before cooking.
- Don’t Overcrowd the Pan: Give scallops space for proper caramelization and to avoid steaming.
- High Heat, Short Time: Cook scallops quickly on high heat to keep them tender and juicy inside.
- Use Unsalted Butter: This helps control seasoning precisely without accidentally making the dish too salty.
- Butter Basting: Continuously spoon melted butter over scallops in the last step for extra moisture and flavor.
How to Serve Pan Seared Garlic Butter Scallops
Garnishes
Finish your Pan Seared Garlic Butter Scallops with a sprinkle of finely chopped fresh parsley or chives for a pop of color and fresh herbal aroma. A light dusting of freshly cracked black pepper adds a touch of spice and visual appeal.
Side Dishes
This dish pairs wonderfully with a variety of sides—creamy risotto, garlic butter pasta, sautéed asparagus, or a crisp green salad all complement the scallops perfectly. For a light option, try a citrusy quinoa salad or steamed broccoli.
Creative Ways to Present
Serve scallops arranged over a bed of lemon-garlic mashed potatoes or atop a vibrant mango salsa for a bright contrast. For entertaining, skewer scallops and drizzle with garlic butter for an elegant appetizer presentation.
Make Ahead and Storage
Storing Leftovers
Store leftover Pan Seared Garlic Butter Scallops in an airtight container in the refrigerator for up to two days. It’s best to keep the sauce separate from the scallops to maintain texture.
Freezing
It’s best to enjoy scallops fresh, but you can freeze cooked scallops for up to one month. Wrap tightly in plastic wrap and a layer of foil to prevent freezer burn. Thaw overnight in the fridge before reheating gently.
Reheating
Reheat scallops gently in a low-temperature oven or in a skillet over medium-low heat with a touch of butter to prevent drying out. Avoid microwaving which can make them rubbery and tough.
FAQs
Can I use frozen scallops for this recipe?
Yes, but be sure to thaw them completely and pat them dry before cooking to get the best sear and texture with your Pan Seared Garlic Butter Scallops.
What type of pan is best for searing scallops?
A heavy-bottomed skillet, such as stainless steel or cast iron, works best to achieve a beautiful crust without sticking.
How do I know when scallops are cooked perfectly?
Scallops are done when they have a golden crust on both sides and the center is opaque but still tender—typically 2–3 minutes per side.
Can I make the garlic butter sauce ahead of time?
Yes, you can prepare the garlic butter mixture ahead and add it during the last minute of cooking for optimal freshness and flavor.
What should I serve with Pan Seared Garlic Butter Scallops for a dinner party?
Consider pairing them with creamy risotto, garlic mashed potatoes, or a fresh arugula salad dressed with lemon vinaigrette for an impressive and balanced meal.
Final Thoughts
If you’ve been searching for a quick yet elegant seafood dish, Pan Seared Garlic Butter Scallops are the answer. They’re simple to prepare, bursting with flavor, and perfect for impressing guests or treating yourself on any night. Don’t hesitate—grab some fresh scallops and let this recipe become your new favorite go-to!
Related Posts
PrintPan Seared Garlic Butter Scallops
Juicy, flavorful Pan Seared Garlic Butter Scallops with a crispy golden crust, featuring tender scallops cooked to perfection and coated in a rich garlic butter sauce. This quick and easy restaurant-quality recipe is perfect for weeknight dinners or special occasions, combining fresh scallops, fragrant garlic, and bright herbs for an impressive and delicious seafood dish.
- Prep Time: 5 minutes
- Cook Time: 10-12 minutes
- Total Time: 15-17 minutes
- Yield: 3-4 servings 1x
- Category: Appetizers
- Method: Pan Seared
- Cuisine: American Seafood
- Diet: Gluten Free
Ingredients
Main Ingredients
- 12 fresh sea scallops (dry-packed, without preservative gels)
- 2 tablespoons unsalted butter
- 3 garlic cloves, minced
- 1 tablespoon olive oil
- 2 tablespoons fresh parsley, chopped
- 1 tablespoon fresh lemon juice
- Salt, to taste
- Freshly ground black pepper, to taste
Instructions
- Prepare the Scallops: Pat your fresh scallops dry thoroughly with paper towels to ensure a golden crust. Remove the small side muscle if still attached, then season both sides lightly with salt and pepper.
- Heat Your Pan: Heat a large heavy-bottomed skillet (stainless steel or cast iron) over medium-high heat. Add olive oil and allow it to shimmer but not smoke, creating the perfect searing temperature.
- Sear the Scallops: Gently place scallops into the hot pan with space between each. Cook without moving for about 2 minutes until a deep golden crust forms. Flip and cook an additional 1-2 minutes until opaque and tender inside.
- Add Garlic Butter: Reduce heat to medium-low. Add butter and minced garlic to the pan. Spoon the garlic butter repeatedly over the scallops for about a minute, allowing the rich flavors to soak in.
- Finish with Herbs and Lemon: Sprinkle chopped parsley over the scallops and squeeze fresh lemon juice on top just before removing them from heat. This step adds brightness and a fresh herbal aroma.
Notes
- Dry scallops are essential to achieve a perfect sear; wet scallops will steam instead.
- Don’t overcrowd the pan to prevent steaming and ensure caramelization.
- Cook scallops quickly over high heat to keep them juicy and tender.
- Use unsalted butter to control seasoning and avoid over-salting the dish.
- Continuously baste scallops with garlic butter in the final step for enhanced moisture and flavor.
Nutrition
- Serving Size: 4 scallops
- Calories: 210
- Sugar: 0.5g
- Sodium: 220mg
- Fat: 13g
- Saturated Fat: 7g
- Unsaturated Fat: 5g
- Trans Fat: 0g
- Carbohydrates: 2g
- Fiber: 0.2g
- Protein: 20g
- Cholesterol: 85mg
Keywords: pan seared scallops, garlic butter scallops, quick seafood recipe, easy scallops, restaurant-quality scallops, gluten-free scallops